I’ve had the fabric for years, a lovely light blue (denim, I think) that had sun-fading streaks when I bought it (the price reflected that), necessitating some creative laying-out of pattern pieces.
The pattern (vintage Misses Simplicity 5819, Size 10, local second-hand) has been in my stash for a while. A couple of weeks ago I dreamed of putting them together, but it wasn’t until Mom visited that we finally got the ball rolling (she loves to sew–I don’t!). Thanks, Mom :).
Further thanks go to my prince for being my stabilizing force in the stresses of sewing & gathering heavy fabric with breaking thread (yikes!) and for his photography :).
I lengthened the skirt by using the pattern piece for View 1, which has tucks, straightening the edges & not sewing the tucks. If I make this pattern again, I may narrow the top of the main skirt pieces for a final upper circumference of 40″ instead of 60″ (!) –there’s too much gather at the waistband for my taste (especially for such a heavy fabric).
I added crocheted lace trim (which I’d made for a different skirt, but ended up not using) at the base of the ruffle:

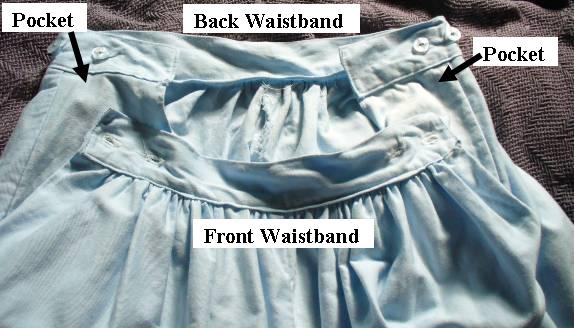
I used my new favorite waistband (copied from a ready-made skirt Mom resewed for me), and the skirt pocket from the old McCalls 5378 (a different pocket would work as long as it’s at least 3″ wide at the top). This eliminates the need for a zipper (a problem for me, since zippers are practically all polyester, which makes me itch) by putting the skirt closure at the pockets (which my skirts must have!). It also makes the skirt very size-adaptable, if I happen to gain or lose a few pounds. I just use the next button out (and I can move the buttons if I need to).

The waistband is made of two rectangles of fabric: 13″x4¼” (front) & 24″x4¼” (back). Actually, the back is bigger than I need–I’ll cut it down to 22″x4¼” next time.
To figure out your own size, the front piece should be one inch less than half your waist + 1/2″ seam allowance (or 1 1/2″ seam allowance, if you’re using a 5/8″ seam–I use 1/4″ for this). This puts the buttons slightly to the front for easy buttoning. For the back, add 9″ to the length of the front.
Iron a 1/4″ hem on all sides of each waistband piece, fold the rectangle in half the long way (the fold is the top of the waistband) & set aside.
Finish the top 7″ of the slanted side of each pocket piece (where they’d normally be sewn together) and sew the vertical sides to the upper side seams of the main skirt pieces (right sides together). Sew pocket pieces to each other, leaving the top 7″ (the edge you just finished) unsewn (this is your skirt opening).
Fold the front pockets back along the top of the skirt piece, gather the top of the skirt (not the pockets!) to match the front waistband piece, sandwich the top of the skirt & the pockets in the bottom of the folded front waistband & sew together from the outside of the skirt.
For the back, open the pockets out & gather the main body of the skirt (not the pockets!) so that the entire length fits the back waistband. Again, sandwich the pockets & top part of the skirt in the waistband & sew from the outside of the skirt. Sew two buttonholes lengthwise at each edge of the front waistband, spaced about an inch apart. Try on skirt and mark where to sew corresponding buttons on the back waistband.
More pictures…
Front:
Side:
Twirling!


Pingback: Don’t Underestimate the Importance of Belaying | At Home in our Domestic Church