When I found “magic boxes”, I had to give them a try.


The butterfly is from Silhouette, with a rainbow fill added (I was astonished to learn that although Silhouette doesn’t allow copy & paste between files, it does allow “drop & drag” from almost anywhere!). I brushed them with glue & sprinkled with clear glitter.
The swirl embossing was done by cutting a file I created in Silhouette Studio (which WordPress won’t allow me to upload) and using a stylus to press squares of cardstock into it. A little brush with an inkpad brought out the design.
Lift the lid, and the box falls open:

The text reads:
In Celebration
Nine Months After
Your InCarnation
Happy Birthday!
(“Carne” means “flesh”,
so “Incarnation” literally means “enfleshment”, ie. conception–
the carnation gets its name from being flesh colored)
The green “fill” is a photo of our lawn in bright sunlight under trees.
Carnations are one of my mom’s favorite flowers, so I worked them in with the butterflies.
The carnations were made by folding squares of paper in half twice

…cutting with tiny zigzag scissors (with a cut down the center & each side to make petals)
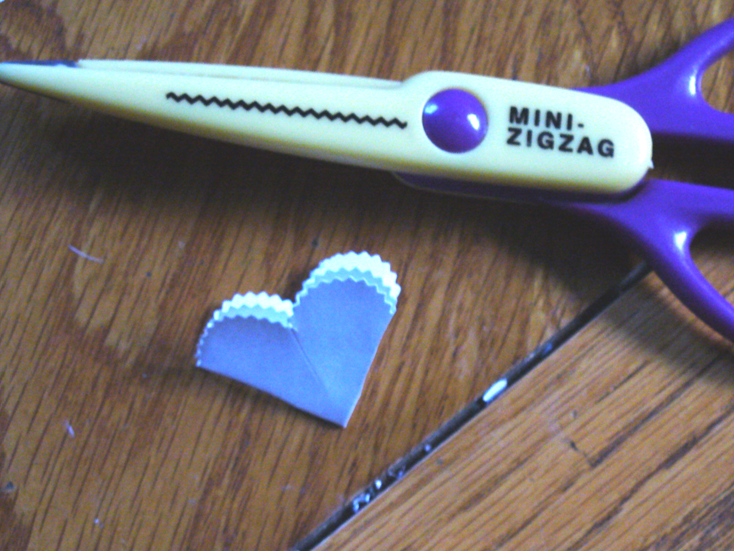
…pleating the edges against my fingers with a pair of tweezers

…crumpling the petals along the pleating & rubbing the tips against an inkpad

…and layering 8 or 9 sets of these for each flower (gluing them together in the center). A calyx cut from similarly folded green paper finished each one off.
The ovals were also designed & cut in the Silhouette (although I had to finish a lot of the cuts by hand–I was having trouble with my blade with things that intricate).
To make the flowers & butterflies “fly”, I cut strips of plastic left from laminating relic cards (The cards are laminated several per sheet & cut out, so there are scraps of fused plastic from the edges). I bent back about 3/8″ on each end, glued a butterfly or flower to one bent end & tucked the other through a slit in the base of the card. I glued down the bent ends on the underside of the card, then cut a second bottom to glue over them (to hide & stabilize them).

A personalized greeting was written on a separate square of paper & glued into the under side of the lid.
It was a hit!

Absolutely beautiful! I’m sure it is a treasure for the recipient! Thanks for sharing the “how to”.
Thanks for the comment :). Glad you liked it!
These are amazing!
I love being able to make the butterflies “fly” :)!