Puff Stitch Continuous Crocheted Rosary

JMJ

I was given a crocheted rosary by a friend who was interested in learning to make more rosaries like it.
She asked me to figure out the pattern.

It is a different shape than typical rosaries–some prefer it for praying while driving,
so there’s nothing to dangle from the steering wheel.


Here’s what I came up with after a bit of research, inspiration, fiddling & practise.
I found the ideas for the cross here and here.
The site where (I think) I got the idea for the puff stitches seems to be down.

If anyone knows the origin of this style of rosary,
I would love to give credit to the crochetier who came up with it!

Puff Stitch Rosary

Thread is size 10, aka “Knit Cro-Sheen”
Steel hook size 6 (I’ve used as small as size 9 successfully).
Rosaries vary from 14″-16″ with different colors of thread.

Cross (illustrations follow):
Ch 3, 3 sc in farthest stitch from hook, ch 1, turn
R2-6 (next 5 rows): sc in each sc across (3 sc). Ch 1, turn
R7: sc in each sc across, ch 4, turn (this begins the first arm of the cross)
R8: working across chains just made, sc in second ch from hook & in each ch & each sc.
ch 4, turn (this begins the second arm of the cross)
R9: sc in second ch from hook & in each ch & each sc. Ch 1, turn
R10: sc in next 6 sc. Ch 1, turn.
R11: sc in next 3 sc. Ch 1, turn (this begins the top of the cross)
R12: sc in each sc across, ch1, turn.
R13: sc in each sc across, turn & slip stitch in middle sc.
To continue rosary, chain 6, pulling up the 5th chain to enlarge it before completing the 6th chain.

02CrossFinish

Beads: 9-loop puff stitch
(see notes at bottom of post for tips on where to insert the hook in the ch for the puff st):
Pull working loop back on the hook to get it nice & loose, then return to working position.
*Yo, insert hook in first ch from hook (the loose ch)*, pull up a loop. Keep this loop loose too.
Repeat from * 3 more times (4 total) until you have 9 loops on the hook.
Yo & pull through all 9 loops
(easier said than done & definitely easier if the loops aren’t too tight).
Ch to secure puff stitch.
Ch 6, pulling up the 5th chain to enlarge it before completing the 6th chain.
This your first Our Father bead.

Ch 6, pulling up the 5th ch to make room for the first “Hail Mary” puff stitch.
Make a puff stitch into the loose chain.
When you ch to secure the bead, pull up that loop to enlarge it, complete the ch
& puff stitch into the enlarged stitch.
03aPuffSt

Continue in this manner until you’ve made 10 Hail Mary beads.

Chain 6, make a puff stitch for an Our Father bead, chain 6, make 10 puff stitches for Hail Mary beads,
repeat until you have 5 decades. Do not fasten off.

Second cross:
Ch 7, 3 sc in second stitch from hook. Continue with rows 2-13 of cross.
Leave a long tail for sewing & fasten off.
Line up the two crosses & sew together using the tail.

04SewCrosses

Notes:
*Most instructions are for making puff stitches in a foundation of sc, dc, etc., not in chains. Making puff stitches in chains means deciding which strands of the chain to go through, and different choices yield different results. Going under the top two strands (which is what you’d do with sc, dc, etc.) results in puff stitches that face different directions–mine did so randomly. This is what ended up working best for me:
Insert hook through the hole that naturally opens up as you pull the hook down to go into the stitch, ie., under the back & bottom strands of the chain. They will be the two farthest away from you.

Hail Holy Queen medal option: After last Hail Mary puff stitch, ch 10, dc into 4th chain from hook 4 times. Ch 3, turn. 4 dc cluster into stitches of previous row (the photo is just a sample–I haven’t actually crocheted a rosary with an oval for the Hail Holy Queen–the oval would be crocheted into the rosary if you wanted it). Proceed to second cross.

Please let me know if this pattern needs correction or clarification :).

“The Gay Mantilla” Fascinator–My Version

(Back when this pattern was named,
“gay” was still commonly understood to mean “merry”
& had no sexual overtones)


This mantilla fascinated me for *years*
(yes, I love calling it a “fascinator”!)
before I finally broke down & bought the pattern.
I got stuck with the very beginning & with the edges.
I looked for photos of the finished product that could help me figure it out.
I found none.
Not one!
Perhaps I’m not the only crocheter to get stuck on this one?
So I messed with it until I got it to work.
I adapted the decorations to my liking
(the flowers & cross are not a lock-step of what the pattern does).
And I determined that I’d finish it & post lots of pictures online
so other people could get it to work!

Here are my annotated photos.

I used size 30 crochet thread & a number 11 steel hook.

These are a little like “connect the dots” by number. The sequence isn’t entirely as expected.

From there, the pattern is tedious to work,
because you’re going into individual stitches all the time,
but it’s not difficult.

I did notice, partway through, that my dtc at the ends of rows
ended up shortening the “diamond” they finished,
whereas the ch 14 with which rows started did not (see photo).

I made a point of making my dtc looser & longer after that,
which helped,
but since the edging is the same all the way around, the short dtc makes the edging crowded.
I might add an extra wrap around the hook on those stitches if I make this again–
& just make it as long as I want it (which might mean fewer rows).

Then the trim didn’t work.
The pattern said “Repeat from*”, but there was no “*”.
And when I repeated from the most logical spot,
what I got didn’t look like the picture (wrong number of stitches).
So I messed with it again.
And I looked online again…and found a free scan of the original pattern!

A big THANK YOU to Kathryn Roloff, for donating the pattern,
to Yvonne DeBandi, for editing it
and to The Antique Pattern Library for posting it!!!

Perusing the relevant part of the scan revealed that a line had been omitted
when the version I purchased had been typed in (it’s not a scan).
That line includes the missing asterisk
and the instructions for most of the trim (*whew*).

I never did figure out the gathering.
How much of the center front should be gathered?
How much gather should there be (the picture doesn’t look gathered to me).
What’s the purpose of the gathering?
Is the 12″ from the end in the back measured straight up from the point,
or is it measured along the edge?

If you have any input, please share it in the comments!

My best guess is that the “gathering” is more like “stay stitching”,
so the crochet doesn’t stretch at those points.
I ended up “easing” from just past each of the outer three flowers at the center front
(top of the head)
& leaving the rest as is.

I wasn’t fond of the flower that came with this pattern,
so I just made one to photograph


& designed my own. I stopped at 20 flowers (the pattern calls for 41!)

My flower:

R1: ch 5, make 4 (dc, ch1) in first ch. Join with sl st to back loop of 4th ch of initial ch 5.

R2: ch 6, in same back loop as joining, *make 2 (trtrc–4 wraps around hook–ch 1), 3 (5 wraps around hook, ch 1), trtrc, ch 1, trtrc, ch6, sl st. Sl st into back loop of next dc on previous row (skip the ch 1 in between), ch 6. Rpt from * until there are 5 petals.

Center: attach center color thread (or keep going with the main color) to the front loop of any dc in the first round.
Ch3, sl st in same loop. Sl st into next available front loop & ch 3, sl st in same loop. Work around the outside of the center this way & then into the middle (I usually end up with about 5 little yellow “bobbles” around the edge & one in the middle).

The flowers are sewn on roughly in the center of each petal all the way around, to give them some dimension without letting them crumple.

I added the cross (inspired by this one from Maggie’s Crochet),
since this will be worn for Mass.

If anyone’s interested, I can try to turn my scribbles
into something recognizable as a pattern for my version of the cross :).

Please let me know if I can help in any way
to make this pattern crochet-able for you!


Panorama Egg Tutorial: Swans

AMDG

I played :).

I pierced a jumbo egg on top & in the front,
used tiny embroidery scissors to cut an oval in front & a circle on top,
& dumped out the egg.

Then I soaked it in dilute blue food coloring with a splash of vinegar
until I got the color blue I wanted for the sky inside the egg
(I hadn’t been planning on coloring the outside of the egg,
but some of the coloring spilled, so I made it all match. I like it :).
I removed the egg from the coloring solution & let it dry.

I cut a piece of the cotton from a medicine bottle & glued (white school glue) it into the egg,
then cut a rounded piece of dark green terrycloth ~1 1/2″ around to simulate grass
& glued that over the cotton.

I brushed dilute green acrylic paint over some dried Sweet Annie pieces
to make them look like bushes/trees
& let them dry.

I glued together paper swans (left over from the miniature landscape box card).
I cut an oval of aluminum foil to fit inside the front of the egg,
colored it with a light blue marker &
covered it with Glossy Accents to simulate a pond.
While the Glossy Accents was still sticky, I added the swans to the pond.
I glued tiny stones & bits of fuzz from the edge of the green terry cloth
around the edge of the “pond” to hide the edges.
I glued a tiny butterfly (cut with the Silhouette) to one of the stones.

I made a bench out of strips of cardstock, cut by my Silhouette Portrait.
Two long strips, folded at right angles, form the edges of the seat & back.
Smaller strips are glued across those for the seat
& more small strips radiate from the center for the back.
The legs are a strip each, glued across the bottom of the seat front to back,
bent down at right angles,
then coiled (quilling) & glued to each other in the middle under the bench.
The arms are one small strip each,
glued to the back with a tiny right angle,
then coiled (quilled) & glued to the seat.
I made a “straw hat” from golden brown paper punched with a standard paper punch.
I cut one punched piece smaller & cupped it with a stylus,
then glued it in the center of a full-sized punch.
A thread tied around it for a ribbon would’ve been nice, but only occurred to me after the fact!
I glued a tiny butterfly (cut with the Silhouette) to the bench.

With tweezers & a quilling needle,
I glued the painted Sweet Annie into the eggshell around the back.
I glued in flowers & painted some of the Sweet Annie seed balls
with white & pink acrylic paint & a tiny brush to look like flowers
then added “flying birds” cut freehand from scrap cardstock (colored with black marker).

I glued in the bench, then glued in the pond with the swans (all with white school glue).

To finish the outside, I glued punched leaves & a paper rose
(which I made some time ago with punched 5-petal flowers)
at the center bottom, covering the rest of the edge of the opening
with 1/8″ white nylon cording from Hobby Lobby.
I glued a paper butterfly (also cut with the Silhouette) next to the cording.
I used the same cording to cover the edges of the hole on top.

The hole on top serves as a “skylight” to help illuminate the scene inside.
I saw the idea online & am very pleased with the way it turned out,
although I think I will cut it a little farther back next time.

The stand is cardstock punched with the “Marta” Multi-shaper punch from Blue hills Studio
& glued into a cylinder.

Father’s Day Wallet Card

AMDG

This came out too well not to share!

I liked the wallet cards I was seeing online
& bore in mind that my dad’s second wife said that he smiled
over the pictures I’d sent in the previous letter.
Those came together in this card…

The wallet is all one piece,
folded up to make the inner pocket,
cut to round the corners,
& glued on the very edges.
The leather-look came from here.
The “stitching” is the dashed line of a Word-drawn rounded-corner box.
For a place for my Prince to sign one for his dad,
I cut out a piece of paper roughly the size of one of the photos.
For mine, I wrote a letter, folded it in half the long way,
& tucked it in the wallet like a dollar bill.

Altar Lace

JMJ

These were designed using Sand Castle Designs software (I couldn’t have done it without it!), which gives a “preview” of the finished pieces.

The design was inspired by a filet crochet piece that is no longer online (too bad–it was beautiful!).

The two smaller pieces are meant to hang from niches holding figures of the Blessed Virgin & St. Joseph, respectively. They are 18″ by 5″, crocheted with size 50 thread & a size 11 hook, using triple crochet, chain 3 filet (instead of the usual double crochet, chain 2, so each square is 4 stitches instead of the usual 3), which makes the design stand out more.

These first two were crocheted starting from the short side, left to right.

avemaria

gotojosephchart

The large piece is meant to drape from the front of the altar. It’s 54″x 10″, with the same size thread & hook & filet type as the other two. For a chart large enough to use, double click on the image & then click the magnifying glass. The second chart makes it easier to count the filled blocks. I’m using both for my own work.
holylatticefinalchart
holylatticeblocks
I hope you’re inspired to pick up your crochet hook & join me in beautifying the house of God!HolyHolyHolyCrop

Miniature Landscape Box Card

JMJ

Here’s what happened when my dream materialized,
of a miniature garden meeting a box card:

Swans
swanoutside

Lift the lid…
swaninsidefront

swaninsideback

Dogs
doggieoutside

(my photos of the inside didn’t turn out, but they’re similar to the…)

Sheep
closedcompressed

frontcompressed

sheepinsidebridge

Teddy Bears
tebbybearoutside

tebbybearinsideteddybearinsidefrontteddybearbenchteddybearswing

I can’t get enough of these! One of these days I need to make one for myself so I can just look at it :)! Pictures just don’t capture the magic of them…and that little teddy bear on the swing is too cute! (not that he wanted to stay there–he wanted to jump off & play somewhere else! ;).

boxcardinside

The boxes are as large as I can make them from 8 1/2″x 11″ coverstock (final 3D size is roughly 2 1/2″ on all sides–slightly taller than wide).

Lids are cut,  folded & glued (the white rectangles are the tabs that hold them together).
boxcardlid

boxcardlidwater
Most of the pieces were cut using a Silhouette Portrait.

The grass is a photo of our lawn.

The water is a photo of the sky, made “watery” with “Glossy Accents”.

The bridge is made by curling a strip of chipboard & gluing tiny twigs of mock orange over it. The railings are cut from chipboard & glued on.

The bench is quilled from strips of coverstock.

The first couple of trees were made using this tutorial, and later ones were made in a similar way, but using branched mock orange twigs taped together with brown floral tape, still gluing on snippets of twine to fill out the “branches” before adding the “leaves” (it was quicker & less messy). Instead of painted sawdust (which I don’t have), I used crumbled dried leaves (mint or parsley, depending which I had in greater quantity). They will fade more over time than the painted sawdust.

The swing is a tiny rectangle of chipboard threaded onto crochet thread–which kept twisting on me! I finally dropped the thread in boiling water & let it dry before using it, which seemed to help relax it. The thread is then glued to the branches of the tree (which requires some patience).

The flowers are mostly punched & shaped with a stylus on a mouse pad. The ones inside are glued around clumps of more dried leaf crumble around tiny stones, both for decoration & to give the sides a little more weight so they fall when the card is opened (the sides still need a little coaxing to go flat).

The teddy bears are cut flat & pasted back to back (so they’re brown on both sides) & shaped to fit the setting.

3danimals

Swans are folded so the triangle is underneath, holding the “tails” apart. Heads & necks are glued together.

Dogs & sheep are folded & glued at the tabs (the long strip wraps around to form the underbelly). This template also includes a sitting dog, which I don’t have in the photos.

The ends of the bows are folded (rounded, not creased folds) to overlap in the center, where they are glued. The piece sticking out at the center is then folded around (over) the ends & glued.

To sign the cards, I either wrote on the inside of the top before gluing it together or wrote on a little square of paper that I then glued into the top.

If you make something like these, I’d love to see it!

Gifts of Love: Crocheted Angels

JMJ

In the process of donating baby items to ministries that serve mothers in crisis pregnancies,
my prince and I came across a related ministry, “Gifts of Love”,
that provides burial gowns and pouches, miniature caskets and memory boxes
to families who have lost babies to miscarriage or stillbirth.

As I was talking with the lady who coordinates the ministry,
I noticed that each casket had a crocheted cross on the inside of the lid.
I could make those! (and I did for a while)
But they also needed little mementos to go in the memory boxes,
and over time, I developed a pattern for tiny crocheted angels.
Since “Gifts of Love” already had someone making crosses, I focused on the angels.

Angel

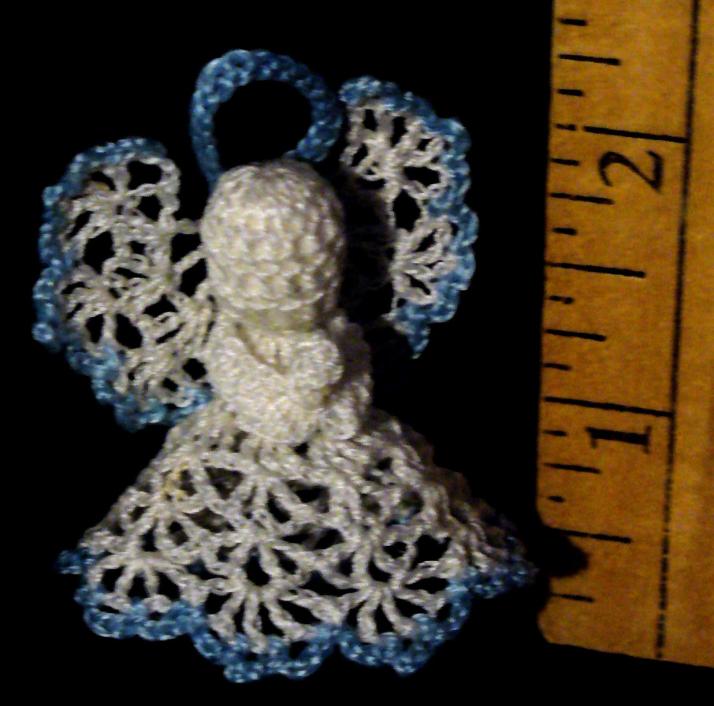
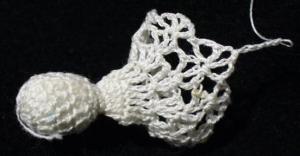
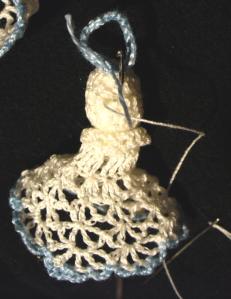
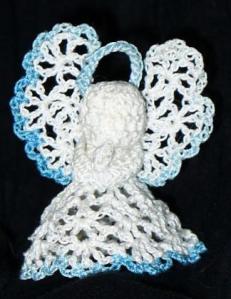
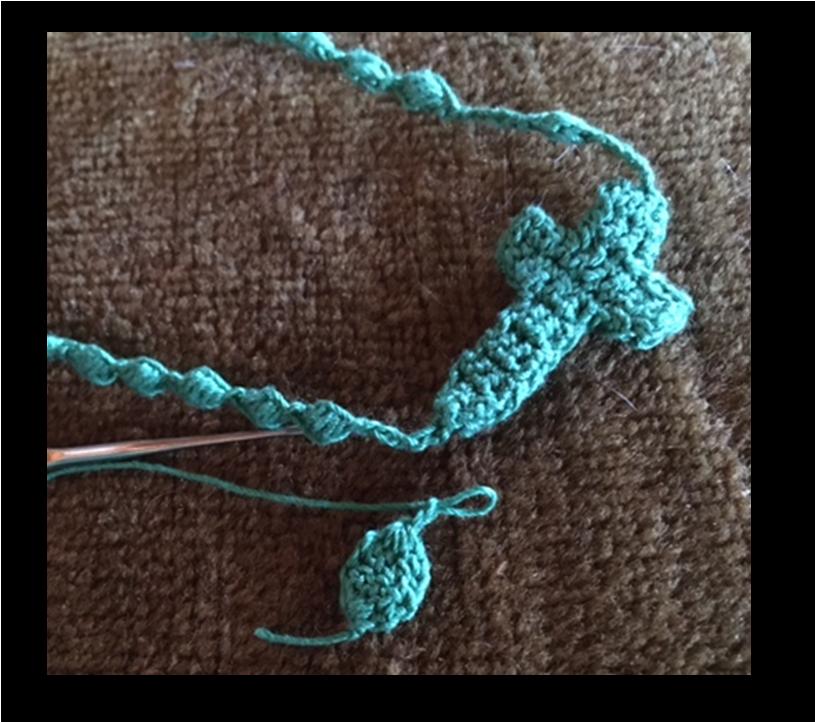
This little angel is trimmed in blue, for a baby boy.
I’ve also trimmed them in pink for girls,
or in gold, for those whose gender is unknown.

MemoryBox

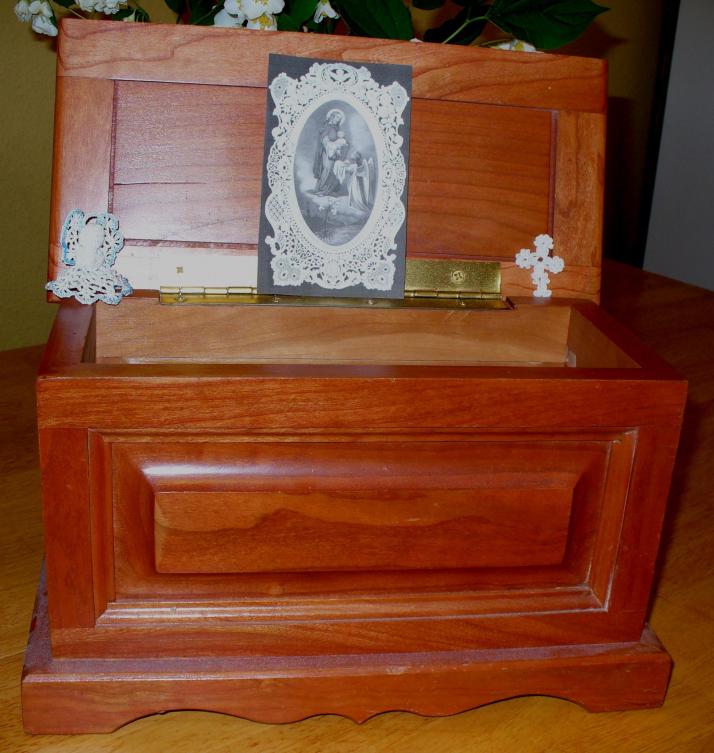
The holy card in the memory box, with Jesus holding a baby
& a guardian angel kneeling before Him,
is from Holy Card Heaven.
It could be taken to be Jesus handing the baby to the angel,
or the angel giving the baby to Jesus.
The inscription reads:

I entrust him to you;
keep him safe for all eternity.


Pattern for Crocheted Angels

Please alert me to any mistakes in the pattern!
I’ve caught several already, but I’m too close to the project to be entirely objective
(I go on kinesthetic automatic pilot).

I use size 30 crochet cotton and a size 11 steel crochet hook.
The first ch 3 always counts as the 1st dc
Make sure to count your stitches in rounds 1-7–it’s easy to add or subtract one!
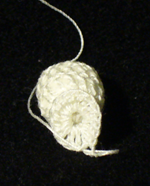
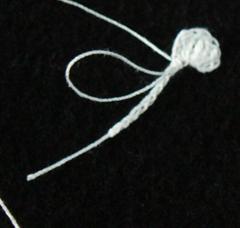
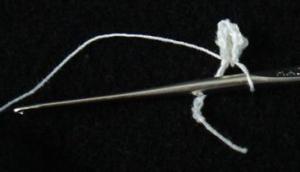
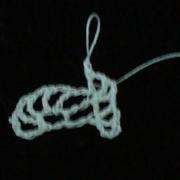
Head:
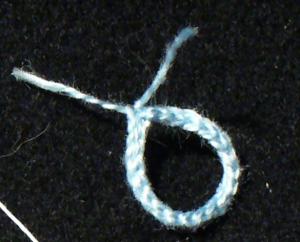
R 1: Starting with a magic circle, ch 3, 15 dc in loop. Sl st in top of beginning ch 3, pull magic loop tight. (16 dc)
If you prefer not to start with a magic circle, ch 4, 15 dc in first ch, sl st to top of original ch 4.
Round1
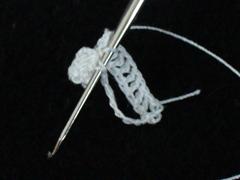
My apologies for the fuzzy photo
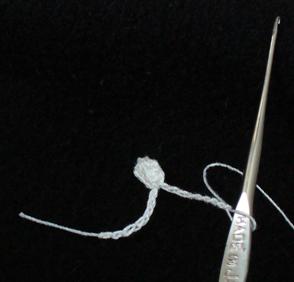
R 2-4: ch 3, dc in each dc around. Sl st to top of beginning ch 3. (16 dc)
Round3
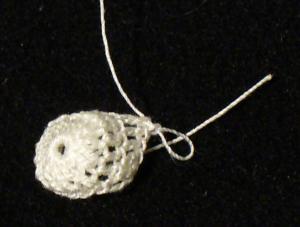
Stuff head. I use rolled up scraps of fabric, but any white stuffing should be fine.
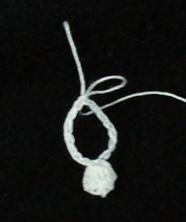
Neck (continued from head):
R 5: ch 1, sc in same stitch as joining, *skip 1 dc, sc in next dc. Repeat from * around. sl st in 1st sc. (8 sc) This gets hard to see, especially with such fine thread. Just make sure you have 8 sc by the time you’re done with the round!

Neck1
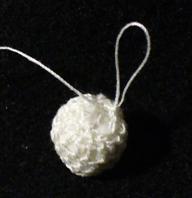
R 6: ch 1, sc in same stitch as joining, sc in each sc around (8 sc)
Bodice (continued from neck):
R 7: ch 3, dc in same space as joining, 2 dc in each sc around (16 dc)
Bodice1
R 8: ch 4, trc in each dc around (16 trc)
Bodice2
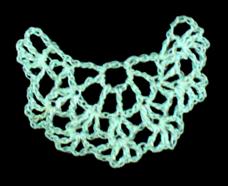
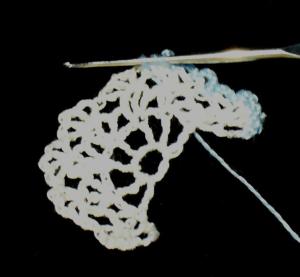
Skirt (continued from bodice):
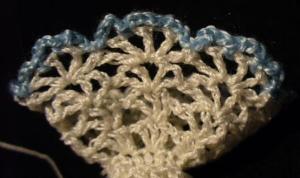
R 9: ch 4, dc in same stitch as joining. *Skip one trc, (dc, ch 1) 3x in next stitch. Repeat from * around, ending with dc, ch 1 in same stitch as original ch 4, sl st in 3rd stitch of original ch 4 (this puts you in position to start the next round without having to sl st to the center of the shell). (8 shells, each 3 dc with ch 1 in between and ch 1 between shells)
Skirt1
R 10: ch 5, dc in same stitch as joining, ch 1. *In center dc of next shell (ie., skip ch 1, dc, ch 1, dc, ch 1), dc, ch 2, dc, ch 2, dc, ch 1. Repeat from * around, ending with dc, ch 1 in same stitch as original ch 5, sl st in 3rd st of original ch 5 (8 shells, each 3 dc with ch 2 in between, ch 1 between shells)
Skirt2
R 11: Ch 5, dc, ch 2 dc. *In center dc of next shell (ie., skip ch 2, dc, ch 1, dc, ch 2), (dc, ch 2) 3x, dc. Repeat from * around, ending with dc, ch 2, dc, ch 2, in the same stitch as the original ch 5, sl st in 3rd st of original ch 5. (8 shells, each with 4 dc with ch 2 in between, no ch between shells)
Skirt3
R 12: sl st into next loop. Ch 5, dc, (ch 2, dc) 3x. *In center loop of next shell (ie., skip dc, ch 2, 2dc, ch 2, dc), (dc, ch 2) 4x, dc. Repeat around, ending with sl st in 3rd st of original ch 5. Fasten off and weave in ends.
Trim: With trim color, right side facing, fasten on in 2nd loop of shell (I pull a loop of the new thread through the loop on the skirt & ch 1 to fasten). Ch 1, sc in same loop, ch 3, sc in next loop, *ch 3, (sl st in next loop)2x, (ch 3, sc in next loop) 2x Repeat from * around, ending with sl st in next loop twice, ch 3, sl st in first sc. (ch 3, sc in main part of shell, sl st when transitioning from one shell to the next). Fasten off & weave in ends.
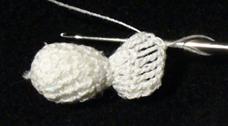
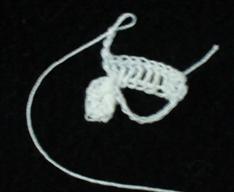
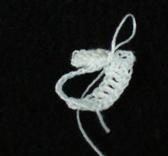
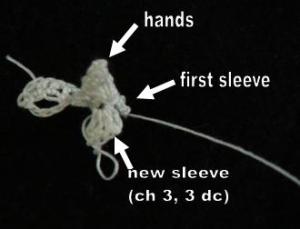
SkirtTrim

Arms & hands:
R 1: Ch 12, 2 dc in 4th ch from hook, 3 dc in next ch, ch 3, sl st in same ch as last dc. This cluster of dc will form the hands.
Hands1
Remove hook from loop and insert it into the same stitch in which you made the 2dc (the far end of the clump of dc you just made).
InsertHook
Catch the loop you dropped
CatchLoop
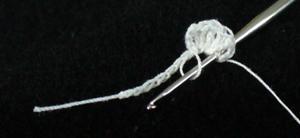
and pull it through to “fold” the hands.
FoldHands
Ch 8, sl st to first ch to form a circle.
ArmsCh8
ArmsCircle
R 2: ch 3, dc in each ch until you get to the base of the hands. 3 dc in same ch, ch 3, sl st in same ch.
FirstArm
FirstSleeveDone
Folding the hands away from you, sl st in base of hands on the far side,
PassOverHands
ch 3, 3 dc in same place.
NewSleeve
dc in each dc around.
The dc following your 3dc next to the hands will be hard to find & hard to get into,
since the previous stitch was packed so tight with stitches–but if you miss it,
there will be a gap in the sleeve. Be persistent :).

Join to top of original ch 3. Fasten off, leaving a tail of about 5″ for sewing the angel together.
ArmsDone
Work the arms down over the top of the angel’s head, hands pointing up (it’ll be a tight fit).
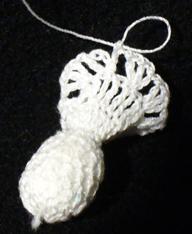
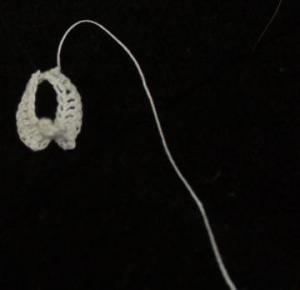
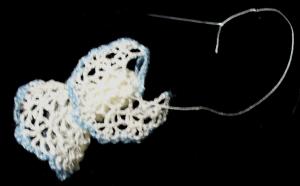
Wings:
R 1: ch 7, sl st in first ch to form ring
R 2: ch 6, trc in ring. Ch 2 trc in ring 5 times (7 trc). DO NOT JOIN!
R 3: Turn. ch 5, dc in 1st trc, ch 2, dc in same trc, *ch 1, dc, (ch 2, dc, ch 2, dc) in next trc. Repeat from * around (7 shells, each with 3 dc, ch 2 between dc, ch 1 between shells)
Wings1
R 4: Turn. ch 4, *(dc, ch 2)3x in next dc, ch 2, dc in same dc, *in center dc of next shell, (dc, ch 2) 3x, ch 2, dc in same dc, Repeat from * around, ending with ch 4, sl st in next ch (7 shells, each with 4 dc, ch 2 between dc, no ch between shells, with an extra loop on the shell on each end. Fasten off and weave in ends.
WingsDone
Trim: With trim color, right side facing, attach thread to 3rd ch of first ch 4 of last round. (ch 3, sl st in next dc) 3x, ch 3, pull up a loop in next dc, pull up a loop in next dc, pull last loop through the other two loops on the hook (2 sl st together). *(ch 3, sl st in next dc) 2x, ch 3, pull up a loop in next dc, pull up a loop in next dc, pull last loop through the other two loops on the hook. Repeat from * around, ending with (ch 3, sl in next dc) 3x, ch 4, sl st in next ch. (ch 3, sl in main part of the shell, 2 sl st together when transitioning from one shell to another). Fasten off & weave in ends.
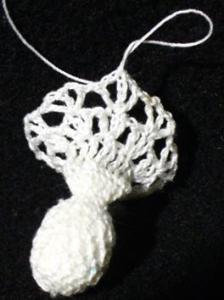
WingsTrim
Halo:
With trim color, ch 20, sl st in 1st ch to form a ring, sl st in each chail around. Fasten off, but leave ends.
Halo
Assembly:
Thread the long thread from the arms into a needle.
Attach arms to bodice by taking the needle into the bodice just under the arms, coning out just over the arms, going into the top of the arms & into the body/head.
Bring needle up through the back of the top of head between the first 2 rounds of the head
SewingHalo
and attach halo with two small stitches (one to the right & the other to the left). Insert crochet hook up through inside of body and head to catch the “tails” of the halo and pull them into the head (hide them without adding bulk to the halo).
CatchHaloTails
Bring needle into head at halo and out at the back of the head. Thread wings onto needle through the center circle (the right side of wings facing the body of the angel) and fasten with a few stitches into the bodice and skirt along the center back. Bring needle up through the body & head, over a tiny bit & back down through the body/head (to secure the thread). Cut thread.
SewWings
Gently tug various parts of the angel into the shape you like.

Angel1

Other stitch patterns also work well in the skirt and wings,
if you’re motivated to play around with them :).

Since I’ve started making these angels, it’s remarkable how many people I’ve come across
who have lost a baby or know someone who has.
Suddenly they started coming out of the woodwork!
It’s been such a blessing to be able honor their suffering,
and to give them an angel (or promise to make one) in memory of their little one.

Interchangeable, Personalizeable Picture Pendant

JMJ

Years ago, I startedImagePartwayIn making my own pendants out of bread/white glue dough, so I could attach my own images. One pendant per image. Now I can wear any image I want in one necklace just by trading pieces of paper/card stock in the back of it!


I started with a 1″x11/16″ oval glass cabochon from the craft store (part of a “Bead Landing” “Found Objects” package), although any size or shape of cabochon should work. With jewelry pliers, I formed a double loop (for hanging) in gold 18 gauge jewelry wire, then wrapped the wire twice around the edge of the cabochon, once a little more toward the front and once a little more more toward the back, ending by wrapping the wire once around the original loop and then bringing it down the back of the cabochon. I took the cabochon out and bent the last bit of wire toward the front a little, so it would put pressure on the cabochon when I put it back in. I secured the cabochon to the front wrap of wire with a line of “Glossy Accents” (any clear adhesive suitable for glass should work).


EmptyPendantFront

Empty Pendant, Front


EmptyPendantSide

Empty Pendant, Side

Empty Pendant, Back

Empty Pendant, Back


Then I just printed the images I wanted on card stock, cut them out and slipped them under the wire on the back of the charm!

PendantAgnes

Pendant with St. Agnes Image


PendantOurLady

Same pendant with Our Lady, Untier of Knots


PendantBack

Back of pendant with image


This design isn’t as secure as I’d like. The images have stayed in for me when I wore them, but they could get knocked out. I have ideas for improving the design, but for now I’m pretty excited about the possibilities!

Birthday Magic Box

When I found “magic boxes”, I had to give them a try.

Cover

Side

The butterfly is from Silhouette, with a rainbow fill added (I was astonished to learn that although Silhouette doesn’t allow copy & paste between files, it does allow “drop & drag” from almost anywhere!). I brushed them with glue & sprinkled with clear glitter.

The swirl embossing was done by cutting a file I created in Silhouette Studio (which WordPress won’t allow me to upload) and using a stylus to press squares of cardstock into it. A little brush with an inkpad brought out the design.

Lift the lid, and the box falls open:
Open

The text reads:

In Celebration
Nine Months After
Your InCarnation
Happy Birthday!

(“Carne” means “flesh”,
so “Incarnation” literally means “enfleshment”, ie. conception–
the carnation gets its name from being flesh colored)

The green “fill” is a photo of our lawn in bright sunlight under trees.

Carnations are one of my mom’s favorite flowers, so I worked them in with the butterflies.

The carnations were made by folding squares of paper in half twice
Fold

…cutting with tiny zigzag scissors (with a cut down the center & each side to make petals)
Cut

…pleating the edges against my fingers with a pair of tweezers
Pleat

…crumpling the petals along the pleating & rubbing the tips against an inkpad
CrumpleTint

…and layering 8 or 9 sets of these for each flower (gluing them together in the center). A calyx cut from similarly folded green paper finished each one off.

The ovals were also designed & cut in the Silhouette (although I had to finish a lot of the cuts by hand–I was having trouble with my blade with things that intricate).

To make the flowers & butterflies “fly”, I cut strips of plastic left from laminating relic cards (The cards are laminated several per sheet & cut out, so there are scraps of fused plastic from the edges). I bent back about 3/8″ on each end, glued a butterfly or flower to one bent end & tucked the other through a slit in the base of the card. I glued down the bent ends on the underside of the card, then cut a second bottom to glue over them (to hide & stabilize them).

SideInside
A personalized greeting was written on a separate square of paper & glued into the under side of the lid.

It was a hit!